PostFinance e-Commerce
1. Introduction
On the next pages we explain you how to integrate your website or shop with our online secure payment page.
With PostFinance e-Commerce you:
- will integrate with payment pages on the highly secured and monitored PostFinance platform
- can customise the payment page in the same look-and-feel of your own website
- don't need to have any certificates or be responsible of sensitive data
2. Technical information page
In your PostFinance account, you'll find the Technical information page via "Configuration" in the top menu.
Per setting in the Technical information page, you'll find the "i" icon to explain the particular setting.
- The request URL in the TEST environment is : https://e-payment.postfinance.ch/ncol/test/orderstandard_utf8.asp
- The request URL in the PRODUCTION environment is : https://e-payment.postfinance.ch/ncol/prod/orderstandard_utf8.asp
|
For test transactions with no financial impact, use the TEST-URL. The transactions will be sent to our test environment thereby to your test account.
For real transactions with financial impact, use the PRODUCTION-URL. The transactions will be sent to our live environment thereby to your live account.
Make sure to switch to the LIVE-URL as soon as you have finalised your tests
|
3. Sale process
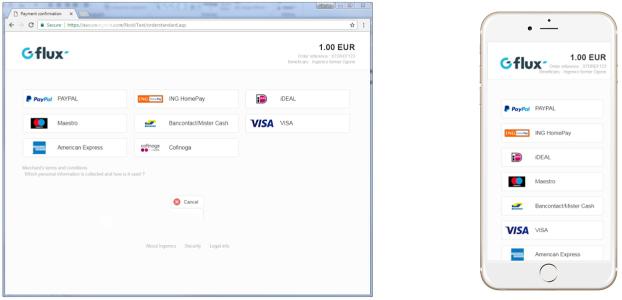
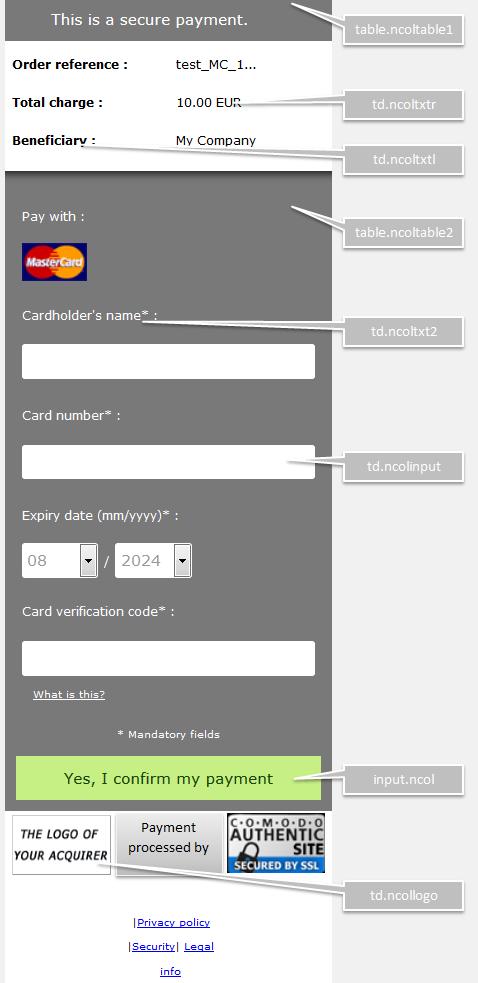
The following screenshots represent a sale process after a basic integration of your website with our system.
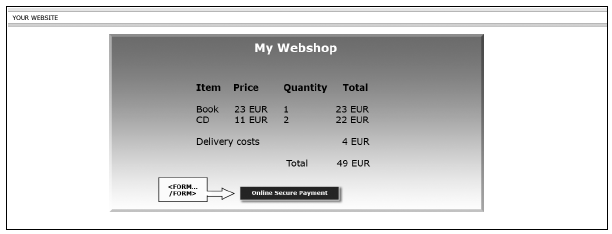
On your website, your customers are shown a summary page with the details of his order. They are requested to confirm this information before proceeding to the secure payment page.
The confirmation button is in fact the visible part of an "HTML form" that contains hidden fields with the payment data, and a submission action that automatically directs the customer in secure mode to a payment page on our server. The hidden fields are described in the Link your website to the payment page chapter.
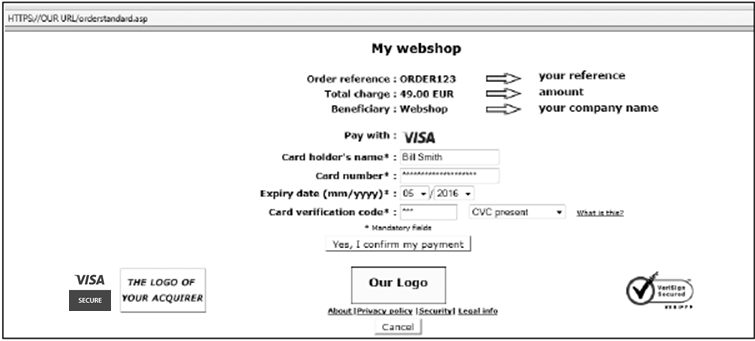
On our secure payment page, the customer can choose any of the payment methods you have selected.
If the payment is done by credit card, your customers will be requested to enter their card details. They can confirm or cancel the payment request.
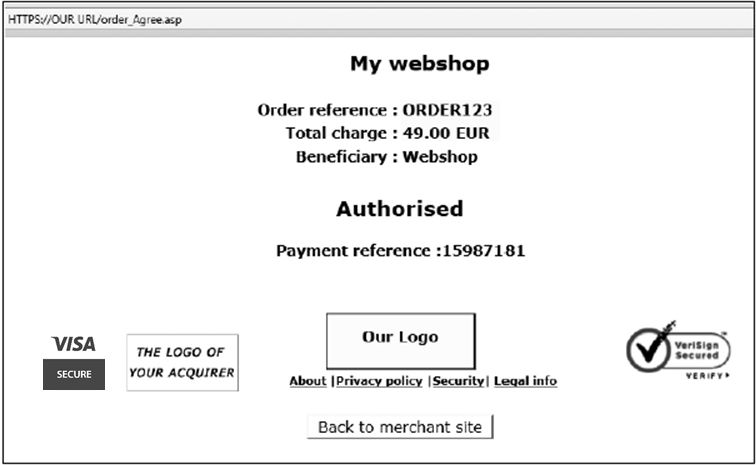
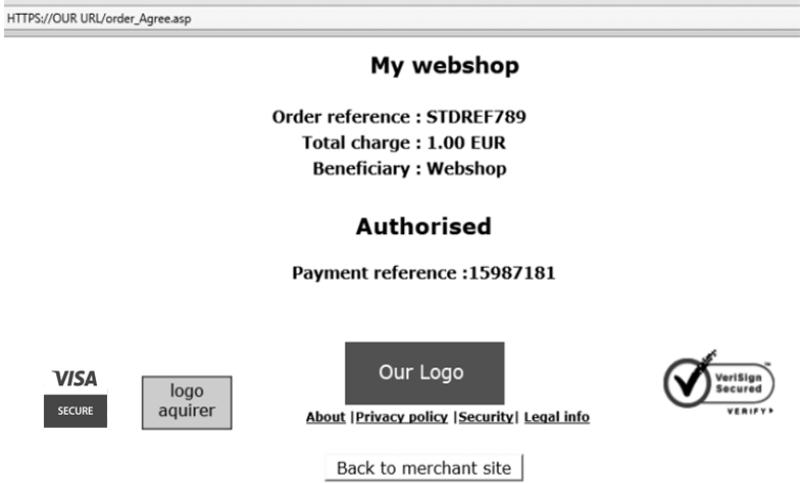
After requesting the payment from the relevant financial institution, we show the customer a page with the result of his payment.
If the payment is refused, an error message is displayed and the customers are given the option to retry: they can either choose another payment method or change the details previously entered.
A specific page on your website can also be displayed to the customer, depending on the result of the transaction. For more information, please see
Redirection depending on transaction result.
4. Link your website to the payment page
4.1 Where to configure?
The link between your website and our e-Commerce payment page has to be established on the last page of the shopping basket on your website, in other words: the last page of your site presented to the buyer.
A form with hidden html fields containing the order data must be integrated into this last page. The block of code you need to paste into the last page of your shopping basket is shown below:
| <form method="post" action="https://e-payment.postfinance.ch/ncol/test/orderstandard_utf8.asp" id=form1 name=form1> <!-- general parameters: see Form parameters --> <input type="hidden" name="PSPID" value=""> <input type="hidden" name="ORDERID" value=""> <input type="hidden" name="AMOUNT" value=""> <input type="hidden" name="CURRENCY" value=""> <input type="hidden" name="LANGUAGE" value=""> <input type="hidden" name="CN" value=""> <input type="hidden" name="EMAIL" value=""> <input type="hidden" name="OWNERZIP" value=""> <input type="hidden" name="OWNERADDRESS" value=""> <input type="hidden" name="OWNERCTY" value=""> <input type="hidden" name="OWNERTOWN" value=""> <input type="hidden" name="OWNERTELNO" value=""> <!-- check before the payment: see Security: Check before the payment --> <input type="hidden" name="SHASIGN" value=""> <!-- layout information: see Look and feel of the payment page --> <input type="hidden" name="TITLE" value=""> <input type="hidden" name="BGCOLOR" value=""> <input type="hidden" name="TXTCOLOR" value=""> <input type="hidden" name="TBLBGCOLOR" value=""> <input type="hidden" name="TBLTXTCOLOR" value=""> <input type="hidden" name="BUTTONBGCOLOR" value=""> <input type="hidden" name="BUTTONTXTCOLOR" value=""> <input type="hidden" name="LOGO" value=""> <input type="hidden" name="FONTTYPE" value=""> <!-- post payment redirection: see Transaction feedback to the customer --> <input type="hidden" name="ACCEPTURL" value=""> <input type="hidden" name="DECLINEURL" value=""> <input type="hidden" name="EXCEPTIONURL" value=""> <input type="hidden" name="CANCELURL" value=""> <input type="submit" value="" id=submit2 name=submit2> </form> |
4.2 Form parameters
Although strictly taken the PSPID, ORDERID, AMOUNT, CURRENCY and LANGUAGE fields are sufficient, we nevertheless strongly recommend you to also send us the customer name (CN), customer’s e-mail (EMAIL), address (OWNERADDRESS), town/city (OWNERTOWN), postcode/ZIP (OWNERZIP), country (OWNERCTY) and telephone number (OWNERTELNO), as they can be useful tools for fraud prevention.
The following table gives an overview of the hidden fields used to transmit the “general parameters” to our system (additional fields are described throughout this and related documentation):
|
Field |
Description |
|---|---|
| PSPID | Your affiliation name in our system |
| ORDERID |
Your order number (merchant reference). The system checks that a payment has not been requested twice for the same order. The ORDERID has to be assigned dynamically. The parameter ORDERID is used to check whether requests are accidentally sent twice to our platform. 2 Consequentially, an ORDERID can be used only once within 45 days. After that period, ORDERIDs already sent can be re-used |
| AMOUNT |
Amount to be paid, MULTIPLIED BY 100 since the format of the amount must not contain any decimals or other separators. The AMOUNT has to be assigned dynamically. |
| CURRENCY |
Currency of the order ISO alpha code, e.g. EUR, USD, GBP, etc. |
| CN |
Customer name Will be pre-initialised (but still editable) in the Customer Name field of the credit card details. |
| Customer email address. If you are requesting 3DSv2.1, please ensure that the format of the email is valid, otherwise the authentication process will fall back to 3DS 1.0 | |
| OWNERADDRESS | Customer street name and number |
| OWNERZIP | Customer postcode or ZIP code |
| OWNERTOWN | Customer town/city/... |
| OWNERCTY | Customer country |
| OWNERTELNO | Customer telephone number |
4.3 Use of ORDERID for structured communication OGM-VCS standard
For payment methods KBC/CBC Online, ING Homepay and Belfius DirectNet it is possible to include a structured communication (Gestructureerde mededeling) according to the OGM-VCS standard in your acquiring payout reports.
This structured communication is visible in our back office for individual transactions via Operations > View transactions.
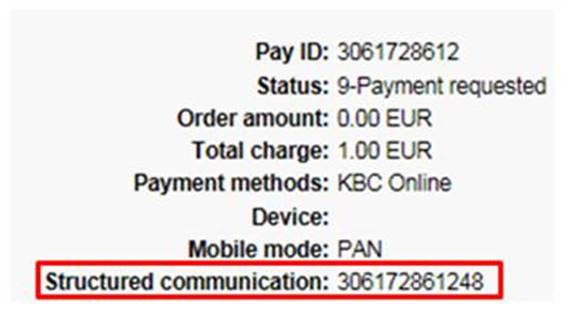
or available as parameter STRUCT via our electronic reporting tool.
To make use of that, you will have to send the value of parameter ORDERID containing only digits.
Depending on the length of the ORDERID, the following content will apply to the structured communication:
| Length ORDERID | >12 | 12 (including Modulo 97 checksum) | 11 | 10 (not including Modulo 97 checksum) | Between 1 and 9 |
|---|---|---|---|---|---|
| Result | PAYID + two check digits (as Modulo 97) will be used for structured communication |
ORDERID will be used for structured communication. The same applies if this value is sent with parameter COM |
PAYID + two check digits (as Modulo 97) will be used for structured communication | ORDERID will be used for structured communication + two check digits (as Modulo 97) will be added by our system |
ORDERID + leading zeros + two check digits (as Modulo 97) will be used for structured communication. Depending on the length of the ORDERID, the amount of leading zeros will vary to get a length of 12 digits in total |
Please align with your acquirer to print out the structured communication on your payout reports, taking into consideration that this might involve a modification of your acquiring contract.
IMPORTANT: OMG-VCS standard not available via Full Service
|
5. Security: pre-payment check
5.1 SHA-IN signature
To verify the data that is submitted to its system (in case of e-Commerce the hidden fields to the payment page), PostFinance requires the secure data verification method SHA. For each order, your server generates a unique character string (=digest), hashed with the SHA algorithm of your choice: SHA-1, SHA-256 or SHA-512. The SHA-IN is auto-populated by the system with a GUID. The default SHA algorithm of your PSPID is SHA-512. Please change this configuration if your system requires the SHA-1 or SHA-256 algorithm.
A similar calculation can be done after the transaction, to verify the parameters returned with the redirection URLs. We call this the SHA-OUT.
|
Although we support hashing methods SHA-1 / SHA-256 / SHA-512, we recommend using SHA-256 or SHA-512. This will provide maximum security for the verification process. |
5.1.1 Creating the string
The string that will be hashed is constructed by concatenating the values of the fields sent with the order, sorted alphabetically, in the format ‘PARAMETER=value’. Each parameter with its value is followed by a passphrase. This passphrase is defined in the Technical information page of your PostFinance account, under the tab “Data and origin verification”, section “Checks for e-Commerce”. Please note that these values are all case sensitive when compiled to form the string before the hash!
|
Important
|
When you hash the string composed with the SHA algorithm, a hexadecimal digest will be returned. The length of the SHA Digest is 40 characters for SHA-1, 64 for SHA-256 and 128 for SHA-512. This result should be sent to our system in your order request, using the “SHASIGN” field.
Our system will recompose the SHA string based on the received parameters and compare the merchant’s Digest with our generated Digest. If the result is not identical, the order will be declined. This check ensures the accuracy and integrity of the order data.
You can test your SHASIGN here, and you can make a test transaction with the SHA Digest calculated by our system here.
|
Example of a SHA-1-IN calculation (with only basic parameters) Parameters (in alphabetical order): AMOUNT=1500 (15.00 x100) SHA-IN passphrase (in Technical information): String to hash: Resulting Digest (SHA-1): |
If the SHASIGN sent in the hidden HTML fields of the transaction doesn't match the SHASIGN constructed at our end with the details of the order and the passphrase entered in the SHA-IN passphrase field (in the Technical information page), you will get the “unknown order/1/s" error message in the Error logs of your account (on the payment page a general error message will be displayed).
If nothing is sent in the "SHASIGN" field in the hidden HTML fields, while a passphrase is entered in the SHA-IN passphrase field (in the Technical information page) indicating you want to use an SHA signature with each transaction – you will receive the error message “unknown order/0/s".
Following is the hidden field used to transmit the SHA signature to our system:
| Field | Description |
|---|---|
| SHASIGN | Unique character string for order data validation. A string hashed with the SHA-1 algorithm will always be 40 characters long. |
6. Payment page look and feel
LOOK & FEEL: Build the payment page in a way that it reflects your brand and the needs of your customers at the moment of proceeding to a payment, concluding with a coherent shopping funnel and increasing your conversion. Our payment pages are composed of 2 elements:
- Static information (e.g. your logo)
- Payment detail information (e.g. order reference, fields where the customer enters his card details, etc.)
The static information originates from our system’s common layout or a specific merchant template page. Our system adds the payment details dynamically for each transaction. You can customize your payment page down to applying a custom HTML and CSS to your content. All you need to do is tell us where to include the "PAYMENT ZONE" and that will take care of the payment on your page.
SECURED HOSTING: PostFinance proposes a secured hosting for your payment page template which allows you to remain PCI compliant.
Note: You can skip the following demo template customization section if you do not plan to customize your payment page.
6.1 PostFinance Responsive Payment Page template
Our fully responsive payment page template is the perfect and easiest solution for a multi-screen online shopping experience for your customers. It ensures you an optimized conversion on both desktop and mobile devices.
- To activate the Responsive Payment Page Template from the Back Office, go to Configuration > Template > Template Selection and click "Activate" the responsive payment page.
- To personalize the template by adding your logo, go to Configuration > Template > File Manager and upload your logo which you named: "logo.png".
6.2 Adapt and upload your own customized template
Begin by downloading below the PostFinance Responsive Payment Page template source file to freely customize and fit your specific brand needs. You can fully design your own template page, leaving just one area on that page to be completed by our system. You can also host your template page and files on our secure environment, which we refer to as "static template".
Download our demo template for e-Commerce payment pages
Feel free to try out our demo templates that support both desktop and mobile browsers. You can use them as such or easily customize them further to fit your needs. To that end you can simply open the template css files and adapt the different value to obtain your desired page.
Other than customizing the provided css files, you can also complete the HTML by adding your own header and footer information. Please see Chapter 5.2.2 for more information. For security reasons, do not apply unauthorized external data/files; all files and data must be uploaded to File Manager in order to be used.
Once completed, follow these steps to download and apply the templates for free:
- Download the zip file.
- From the Back Office, go to Configuration > Template > Advanced Configuration > Allow usage of static template > Yes to activate the Static templates.
- Go to Configuration > Template > File Manager to upload the different files included in the zip file (no folder).
- Go to Configuration > Template > Template Selection to select your preferred “Default merchant template” for e-Commerce.
IMPORTANT:
- For our Responsive Payment Page template you need to arrange the display of the payment methods in a vertical order. You can achieve this by sending the additional parameter PMLISTTYPE=2 for each transaction.
- The platform supports multiple templates. You can overrule the default template for any transaction and select a specific one using the “TP” parameter in your POST request (TP=<full name of the HTML file including extension>).
- We recommend that you limit the size of your logos to 300px for both width and height. This will ensure that the loading time on mobile devices is kept to a minimum
Design your own payment page.
Other than customizing the provided css files, you can also complete the HTML by adding your own header and footer information. Please see Chapter 5.2.2 for more information. For security reasons, do not apply unauthorized external data/files; all files and data must be uploaded to File Manager in order to be used.
6.2.1 Hidden fields
The following hidden field is used to transmit the file name of your template page:
| Field |
Description |
|---|---|
| TP | File name of the template hosted by PostFinance. |
Example:
<input type="hidden" name="TP" value="mytemplatefile.html">
6.2.2 Payment zone
The template page can be designed completely to your liking. The only requirement is that it must contain the string "$$$PAYMENT ZONE$$$" indicating the location where our e-Commerce module can add its fields dynamically. It must therefore contain at least the following:
<html>
$$$PAYMENT ZONE$$$
</html>
| Important Do not use BASE tags, frames or FORM tags to encapsulate the $$$PAYMENT ZONE$$$ string. |
6.2.3 Style sheets
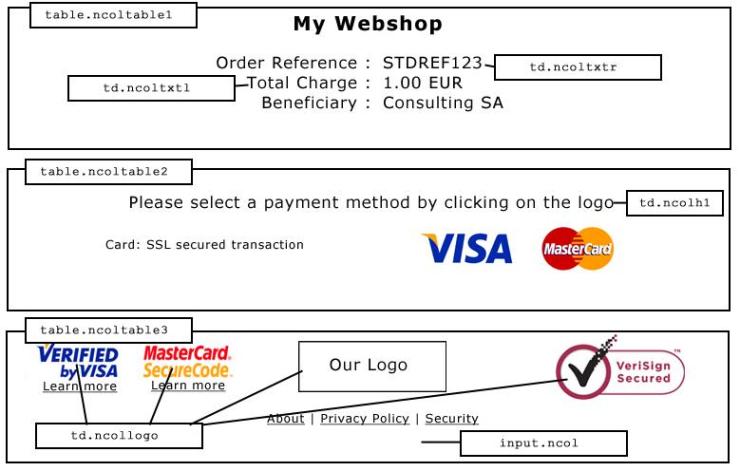
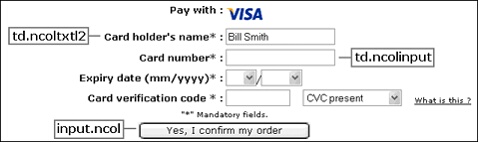
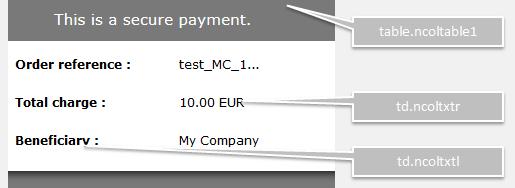
You can personalise the look and feel of your payment pages by adding style sheets to your template page.
We have defined a class for the various types of tables and cells within our tables as well as a class for the submit buttons.
You need to add the following block of code between the tags <head></head> and change the properties of those classes to fit to the look and feel of your site:
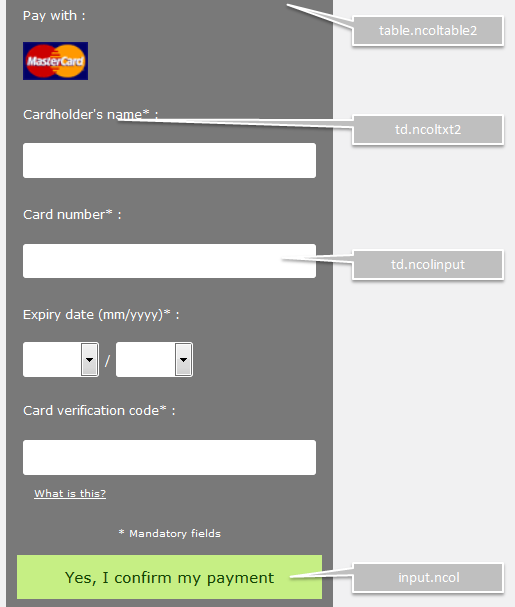
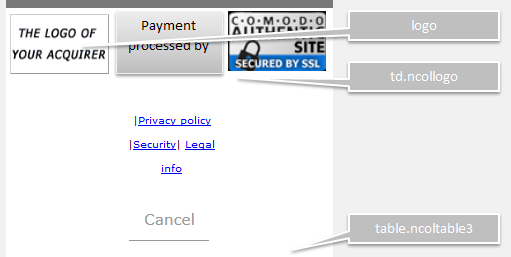
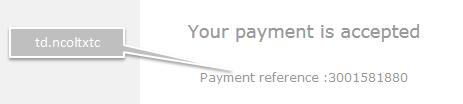
| <style type="text/css"> <!-- td.ncolh1 {background-color : #006600; color : yellow; font-family : verdana} td.ncoltxtl {background-color : #ffffcc; color : black; text-align : right; font-weight : bold} td.ncoltxtl2 {background-color : #ffffcc; color : black; text-align : right; font-weight : bold} td.ncoltxtr {background-color : #ffffcc; color : black; text-align : left; font-weight : bold} td.ncoltxtc {background-color : #ffffcc; color : black; text-align : center; font-weight : bold} td.ncolinput {background-color : #ffffcc; color : black} td.ncolline1 {background-color : #ffffff; color : black} td.ncolline2 {background-color : #ffffcc; color : black} input.ncol {background-color : #006600; color : white} td.ncollogoc {background-color : #ffffcc; color : black; text-align : center; font-weight : bold} table.ncoltable1 { background-color: #ffffcc; } table.ncoltable2 { background-color: #ffffcc; border-width : medium; border-color : green; } table.ncoltable3 { background-color: #ffffcc; } --> </style> |
When you enter your own layout instructions, you must adhere to the cascading style sheet syntax. We strongly advise you to test it in various browsers, as the way they handle style may differ enormously.

6.3 Template hosted by merchant (Dynamic template)
The dynamic template page allows you to customise the design of the payment pages in a more advanced way than the static template does.
When you use a dynamic template page, you fully design your own template page, leaving just one area in that page to be completed by our system. The URL of your template page needs to be sent to us in the hidden fields for each transaction.
Please bear in mind that using a dynamic template page involves an additional request from our system to look up your template page. This increases the time needed for the payment process.
|
Important To comply with the latest PCI-DSS you are required to host your template (and related files) in an environment with the highest PCI certification. |
6.3.1 Hidden fields
The following hidden field is used to transmit the URL of your template page:
<input type="hidden" name="TP" value="">
| Field |
Description |
|---|---|
| TP | URL of the merchant’s dynamic template page. The URL must be absolute (contain the full path), it cannot be relative. Do not specify any ports in your URL, we only accept ports 443 and 80. Any component included in the template page must also have an absolute URL. |
6.3.2 Payment zone
The template page can be designed completely to your liking. The only requirement is that it must contain the string "$$$PAYMENT ZONE$$$" indicating the location where our e-Commerce module can add its fields dynamically. It must therefore contain at least the following:
<html>
$$$PAYMENT ZONE$$$
</html>
| Important Do not use BASE tags, frames or FORM tags to encapsulate the $$$PAYMENT ZONE$$$ string. |
An example of a dynamic template page is available at the following address: https://e-payment.postfinance.ch/ncol/template_standard.htm
6.3.3 Dynamic behaviour
The same template page can be used for all orders, or it may be generated dynamically by the merchant’s application according to the order parameters.
To generate the template page dynamically, the merchant can choose between creating a specific page for the order, whose URL is transmitted in the hidden fields, or using a fixed URL but returning a result derived from the order number. To allow this, our system adds the main payment data – including the merchant’s order reference number – when it retrieves the template page:
HTTP request = url_page_template ?ORDERID=...&AMOUNT=...&CURRENCY=…
6.3.4 Style sheets
You can personalise the look and feel of your payment pages by adding style sheets to your template page.
We have defined a class for the various types of tables and cells within our tables as well as a class for the submit buttons.
You need to add the following block of code between the tags <head></head> and change the properties of those classes to fit to the look and feel of your site:
| <style type="text/css"> <!-- td.ncolh1 {background-color : #006600; color : yellow; font-family : verdana} td.ncoltxtl {background-color : #ffffcc; color : black; text-align : right; font-weight : bold} td.ncoltxtl2 {background-color : #ffffcc; color : black; text-align : right; font-weight : bold} td.ncoltxtr {background-color : #ffffcc; color : black; text-align : left; font-weight : bold} td.ncoltxtc {background-color : #ffffcc; color : black; text-align : center; font-weight : bold} td.ncolinput {background-color : #ffffcc; color : black} td.ncolline1 {background-color : #ffffff; color : black} td.ncolline2 {background-color : #ffffcc; color : black} input.ncol {background-color : #006600; color : white} td.ncollogoc {background-color : #ffffcc; color : black; text-align : center; font-weight : bold} table.ncoltable1 { background-color: #ffffcc; } table.ncoltable2 { background-color: #ffffcc; border-width : medium; border-color : green; } table.ncoltable3 { background-color: #ffffcc; } --> </style> |
When you enter your own layout instructions, you must adhere to the cascading style sheet syntax. We strongly advise you to test it in various browsers, as the way they handle style may differ enormously.
6.3.5 Performance
Our system is configured with a 5-second time-out for the request to retrieve the merchant’s dynamic template page.
Please contact our customer care Merchanthelp, Tel. +41 (0)848 38 24 23, e-mail: merchanthelp@postfinance.ch, to change this time-out.
If a time-out occurs, our system will use the merchant's static template instead.
If no static template is configured, our system will use the PostFinance default layout as a last resort.
| The configured time-out has an impact on both dynamic template requests and post-payment feedback requests (see Direct feedback requests (Post-payment)). Consequently, if the merchant were to change it to e.g. 15 seconds, the feedback request timeout will also increase to 15 seconds. |
For each order, our system performs a request to retrieve your dynamic template page. If you have high transaction volumes or a large template page (e.g. your dynamic template page contains a large number of images), these HTTP requests could take a bit longer. Please contact our customer care Merchanthelp for a solution if you have high transaction volumes.
6.4 Mobile template
You can optimize the display of the payment page on mobile devices (smartphones, tablets etc.) by applying a template page, enriched with style sheets, as explained in the next chapters.
6.4.1 Layout parameters
Below are the fields which can be customised by providing details in a request:
<input type="hidden" name="TITLE" value="">
<input type="hidden" name="BGCOLOR" value="">
<input type="hidden" name="TXTCOLOR" value="">
<input type="hidden" name="TBLBGCOLOR" value="">
<input type="hidden" name="TBLTXTCOLOR" value="">
<input type="hidden" name="BUTTONBGCOLOR" value="">
<input type="hidden" name="BUTTONTXTCOLOR" value="">
<input type="hidden" name="LOGO" value="">
<input type="hidden" name="FONTTYPE" value="">
|
Field |
Description |
Default value |
|---|---|---|
| TITLE | Title of the page | Title |
| BGCOLOR | Background colour | white |
| TXTCOLOR | Text colour | black |
| TBLBGCOLOR | Background colour for the right columns | whitle |
| TBLTXTCOLOR | Text colour for the right columns | black |
| BUTTONBGCOLOR | Button background colour | n/a |
| BUTTONTXTCOLOR | Button text colour | black |
| LOGO |
URL/filename of the logo you want to display on the payment page https://e-payment.postfinance.ch/images/merchant/[PSPID]/[immagine] |
- |
| FONTTYPE |
Font family |
Verdana |
6.4.2 Template
The following hidden field is used to transmit the URL of your template page:
<input type="hidden" name="TP" value="">
| Field | Description |
|---|---|
| TP |
URL of the dynamic template page. The URL must be absolute (contain the full path), it cannot be relative. Any component included in the template page must also have an absolute URL. Important: To comply with the latest PCI-DSS (2015), you are required to host the template items used for the payment page in an environment with the highest PCI certification. Therefore, we recommend you to host your files with PostFinance . |
Payment zone
The template page can be designed completely to your liking. The only requirement is that it must contain the string "$$$PAYMENT ZONE$$$" indicating the location where our e-Commerce module can add its fields dynamically. It must therefore contain at least the following:
<html>
$$$PAYMENT ZONE$$$
</html>
| Go to Example templates to get some inspiration with the templates we've created, or simply create your own template based on ours. |
6.4.3 Style sheets (css)
For ease of managing and understanding of CSS we divided the template CSS into four main parts:
| Note: Although the example images below do reflect which elements will be affected by the css, the style (colours, images etc.) used may differ from what's described in the accomanying example codes. |
Using this style you can modify the header part of the payment page as shown below:
| Element(s) - Lock Part .securedBG { background: #797979; } .secured { padding: 8px 20px 0px 40px; color: #ffffff; width: 235px; margin: 0 auto; background: url("lock.png") 5px no-repeat #797979; height: 30px; } - Order Summary table.ncoltable1 { width: 100%; margin: 0 auto; min-width: 300px !important; } td.ncoltxtl { font-family: open-sans ,Verdana,sans-serif; font-size: 14px; background-color:#ffffff; text-align : left !important; font-weight : bold !important; vertical-align:bottom; } td.ncoltxtr { text-align: left; font-weight: normal; font-family: open-sans ,Verdana,sans-serif; font-size: 14px; background-color:#ffffff; } |
Using this style you can customise the Payment Details section as shown below:
| td.ncolinput { text-align: left; font-weight: normal; font-size: 14px; font-family: open-sans ,Verdana,sans-serif; display: block; box-shadow: none !important; } input.ncol { background-color: #ffffff; height: 40px; font-size: 14px; text-align: center; padding: 0px; font-family: open-sans ,Verdana,sans-serif; margin: 0 35px 20px; border-bottom: 1px solid #999999; border-radius: 0px; -webkit-appearance: none !important; -webkit-border-radius: 0 !important; } td.ncoltxtl2 { text-align: left; font-family: open-sans ,Verdana,sans-serif; white-space: nowrap; display: block; font-size: 14px; background-color:#ffffff; } |
Using this style you can set the footer part of the payment page:
| Element(s) td.ncollogoc { text-align: center; font-weight: normal; font-size: 14px; padding: 2px; vertical-align: top !important; } td.ncollogoc IMG { width: 90px; height: 55px; margin-right: 4px; } .ncollogoc td .ncol { width: auto; padding-right: 10px; padding-left: 10px; cursor:pointer; } .ncollogoc input.ncol { margin-top:10px !important; -webkit-appearance: none !important; -webkit-border-radius: 0 !important; } |
Using this section you can customise the look and feel of the payment status page as shown here:
| Element(s) td.ncoltxtc { background-color:#ffffff; color:#999999; padding: 0px; text-align: left; font-weight: normal; font-size: 14px; border-top: 0px solid #ffffff; font-family: open-sans ,Verdana,sans-serif; } td.ncoltxtc h3 { text-align: center; font-weight: normal !important; padding: 5px; font-family: open-sans ,Verdana,sans-serif; } td.ncoltxtmessage { background-color: #ffffff; color: #999999; text-align: left; font-weight: normal; } |
This is what the resulting page would look like:
6.4.4 Example pages
To get you started, we've created two pages ourselves.
The first one is a branded version which you can use as an example:
https://e-payment.postfinance.ch/ncol/StandardMobileTemplate.htm
You can also use the "stripped" version hereafter as a base to create your own template:
https://e-payment.postfinance.ch/ncol/StandardMobileTemplate_generic.htm
The same two templates with additional files (fonts, images) are available in a downloadable zip here.
6.5 Template File Manager
With the Template File Manager you can easily manage your templates and the various files that come with it.
To start using File Manager, log on to your PostFinance account and go to "Configuration" > "Template" > "File Manager".
| Important It's not possible to simultaneously use files previously uploaded by PostFinance and files uploaded with File Manager in your integration. Therefore, if you have files that were uploaded by PostFinance in the past, please make sure to upload those files again yourself, using File Manager. |
6.5.1 Upload template files
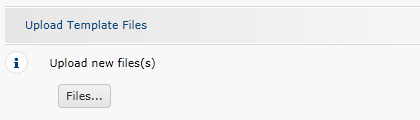
Under "Upload Template Files", select the "Files..." button to browse for the files you wish to upload. You can upload Javascripts, html, css and images (.css, .jpg, .jpeg, .gif, .png, .html, .js), with a maximum of 7 MB per file, and 10 MB in total.
Make your selection and then confirm.
6.5.2 Check and manage uploaded files
After the upload is done, you'll see your uploaded files on the same page in the "Uploaded files" section.
The files will first have the "Validating" status, during which some necessary security/virus checks are being performed.
You can use the files once its status has changed to "Validated".
Click the refresh button ![]() to check the current status of your files / click the delete
to check the current status of your files / click the delete ![]() button to delete the file permanently.
button to delete the file permanently.
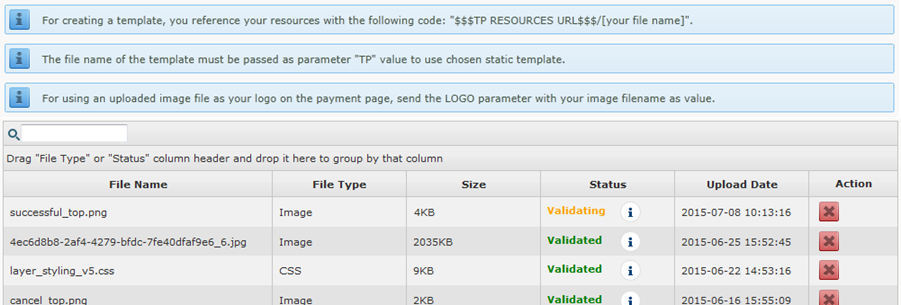
A file will get the "Refused" status if it didn't pass the security check. This can be due to a virus or if the extension of the file is wrong for instance.
6.5.3 Default merchant template
Under Default settings > Default merchant template, you can configure the template you want to apply on the e-Commerce hosted payment page.

If you don't select a default template, the platform's default template is used.
6.5.4 Integration
In your templates you refer to your uploaded files with a code following this structure: $$$TP RESOURCES URL$$$/[your file name].
Note: If you want to use a resource in a CSS file, you should reference the following code: "./[your file name] instead.
Example:
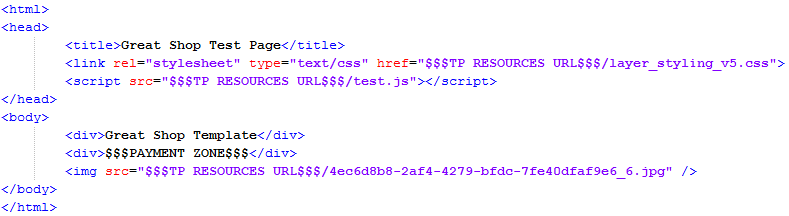
To refer to your uploaded template in your e-Commerce integration, you send the template file name with the "TP" parameter.
Example: TP=mytemplatefile.html
When you have a basic e-Commerce integration using a logo on top of the page, you need to refer to the uploaded logo by sending the filename along with the "LOGO" parameter.
Example: LOGO=mycompanylogo.png
6.6 Template security control
To protect your customers against fraudulent activities, such as the manipulation of sensitive card data (card number, CVC), different security checks for the merchant template were made available.
In your Technical information page > Global security parameters tab > Template section, the following settings can be configured:
- Enable Javascript check on template
You can enable this feature to detect Javascript usage on the template page. If Javascript is detected, the template will be blocked and the default template will be used instead.
- Allow usage of dynamic template (optional, depending on your subscription)
If you select "Allow usage of dynamic template", you must configure the Trusted website host name hosting the dynamic template field. This field can contain multiple web hosts, separated by semicolons, but they should all contain the full URL, e.g. http://www.website.com/. The sub-directories can be left out, so if the dynamic template is http://www.website.com/templates/nl/template1.htm, it suffices to configure http://www.website.com as trusted web host.
Additionally you can also configure one or more fully trusted dynamic template urls, separated by semicolons, in the Trusted dynamic template url field.
If a dynamic template is submitted with a transaction, but dynamic templates are not allowed, then the template will be blocked and our system will use the static template instead.
If there is no static template configured, then the default PostFinance template will be used. By default, "Enable JavaScript check on template" are enabled.
6.7 Secure environment padlock
The URL used to connect the customer to our platform uses a secure protocol (https). All the communication between our e-Commerce platform and the customer is securely encrypted.
However, the small padlock on the browser – which indicates to the customer that the site is secure – may not be displayed if some elements (e.g. images) in the template page are not located on a secure server or if some frames on the screen show pages that do not originate from secure sites.
Even if the payment processing communication is encrypted, most browsers will not recognise a secure connection unless all the elements on the screen, including images, sounds, etc. come from secure sites.
For merchants who do not have a secure site, please bear in mind the following rules:
- Do not use frames for the payment pages: you can refresh the entire screen with a template page that looks as if you are using frames or allow the payment to be processed in a new window.
- Do not link files to the template page (<link> tag) that you use for the payment page. Instead, use the <style> and <script> tags to include styles and scripts into the template page.
- Make sure the images in your template are stored on a secure server (the template page can be on a non-secure server, however the images cannot). We offer hosting for these elements (see the image hosting options in your account).
6.8 Use of payment page in iframe
Iframes allow you to integrate an external web page (such as the payment page) on your website, while maintaining your own URL in the browser.
However, in the current context iframe also has very significant drawbacks:
- Since the URL is the merchant's URL, it could be a simple http (instead of an https) and the padlock icon may not appear in the browser. This could cause customers to doubt the security of the webshop.
- Some payment methods (such as PayPal, Giropay, Sofort, iDEAL and Bancontact/Mister Cash) use redirections, which may give poor layout results and/or navigation misbehaviour.
As a result, PostFinance discourages the use of iframe, and the usage thereof is your responsibility. PostFinance strongly encourages the use of a Dynamic Template instead.
If you still wish to pursue the integration of iframe, we strongly recommend the following:
- Use iframe only on the payment method selection page (and beyond)
- Use pop-ups for external payment methods whenever possible, to ensure the visibility of third-party web applications.
7. Transaction feedback
After a transaction is processed, depending on the result, a response can be sent to your system and to the customer. Hereafter we explain how and when the transaction feedback can be sent, and what you need to set up and configure on your end to make each feedback process work.
|
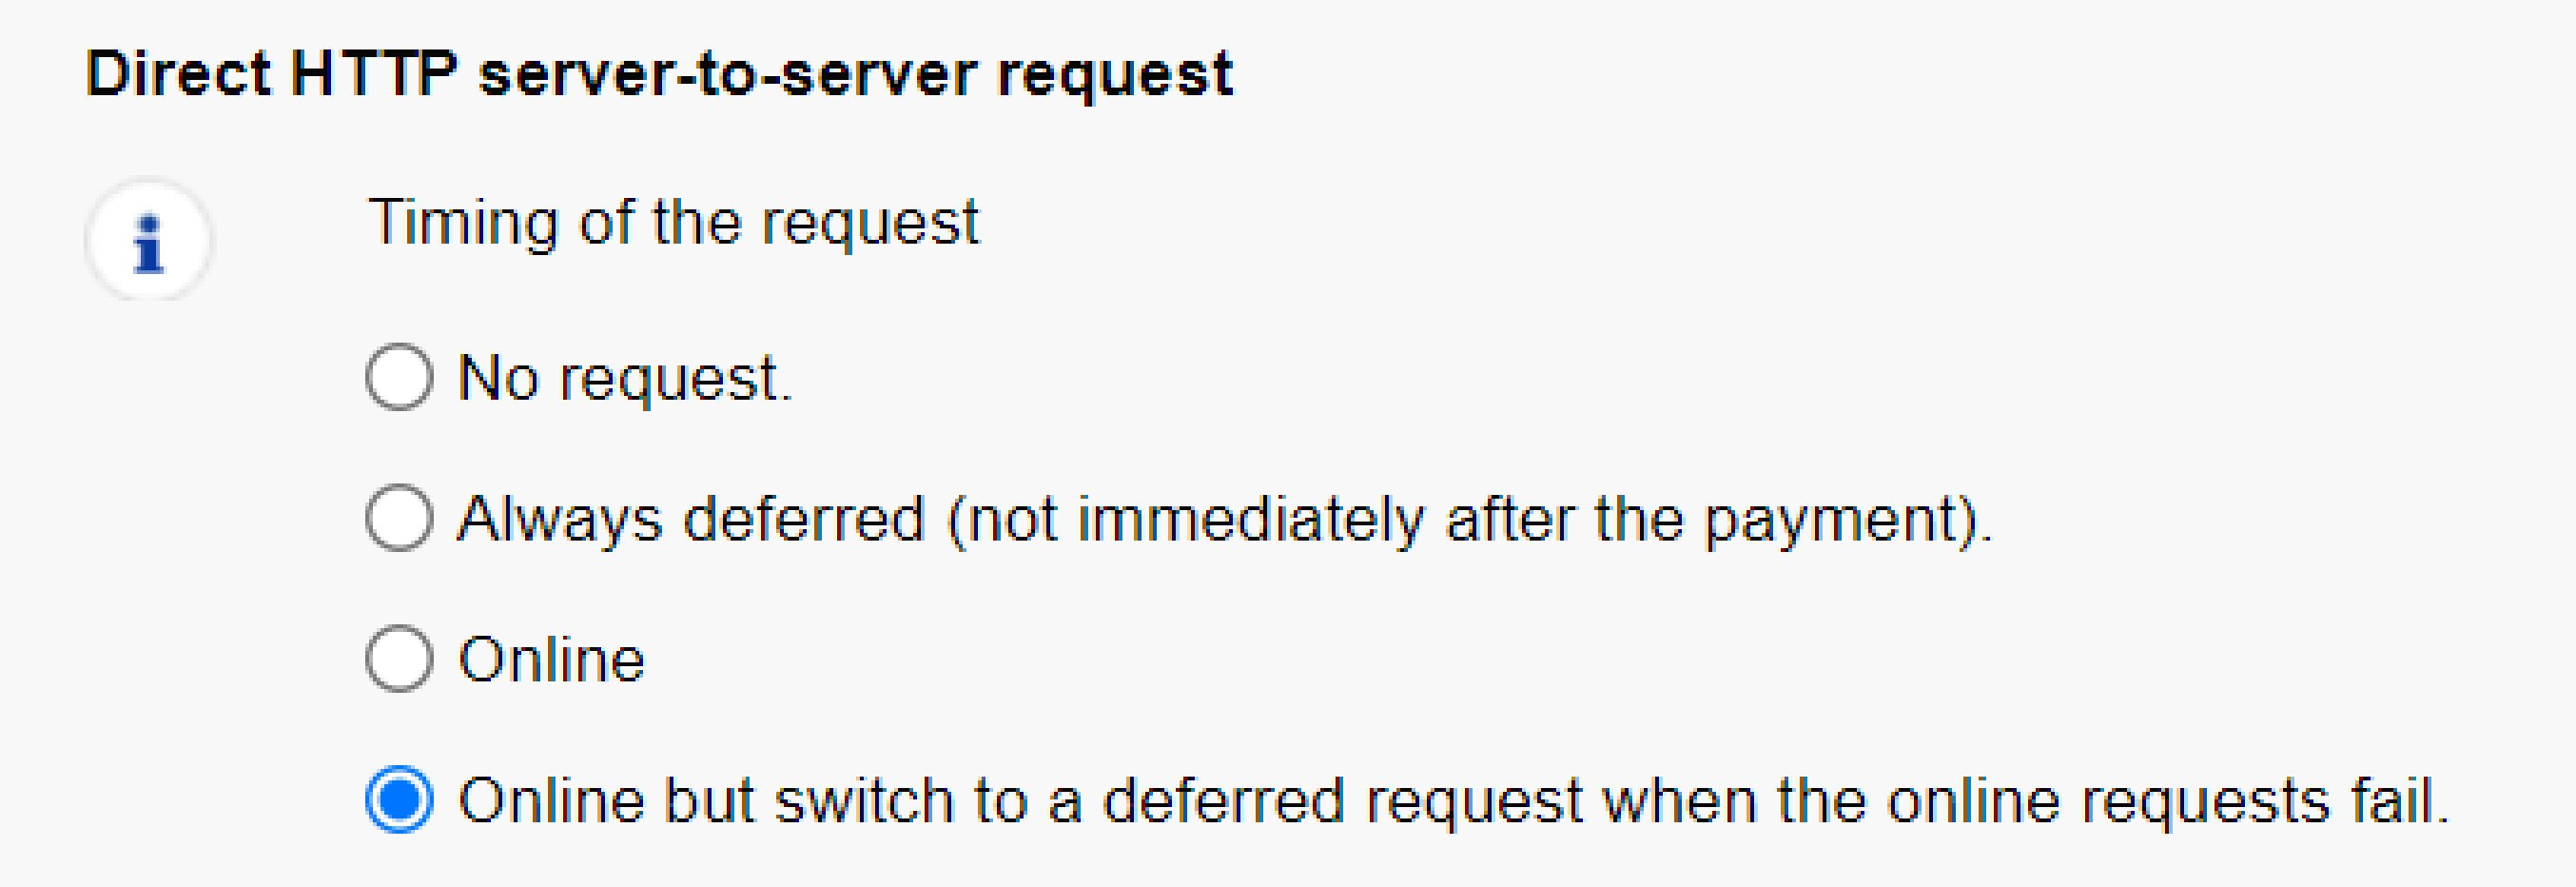
Best practice Redirection with parameters on the accept-/exception-/cancel-/declineurl (Redirection with database update) with a deferred post-payment feedback request as a backup (Server-to-server feedback (post-payment)). In your PostFinance account, go to "Configuration" > "Technical information" > "Transaction feedback". Configure the settings as described below: HTTP redirection in the browser:
Direct HTTP server-to-server request: Online but switch to a deferred request when the online requests fail:
|

7.1 Default reaction
By default, meaning if you haven't configured Transaction feedback settings, our system will display a standard message to the customer: "Your payment is authorised" or "The transaction has been denied".
In this page, we also add a link to your website and/or to your catalogue. Usually, these links are configured in your PostFinance account's Administrative details, which is where our system will fetch them. However, you can also override these URLs by submitting the HOMEURL and CATALOGURL fields with the other the hidden fields in the order form:
<input type="hidden" name="CATALOGURL" value="">
<input type="hidden" name="HOMEURL" value="">
| Field |
Description |
|---|---|
| CATALOGURL | (Absolute) URL of your catalogue. When the transaction has been processed, your customer is requested to return to this URL via a button. |
| HOMEURL |
(Absolute) URL of your home page. When the transaction has been processed, your customer is requested to return to this URL via a button. When you send the value “NONE”, the button leading back to the merchant’s site will be hidden. |
7.2 Redirection depending on transaction result
There are four URLs which our system can redirect the customer to after a transaction, depending on the result. These are "ACCEPTURL", "EXCEPTIONURL", "CANCELURL" and "DECLINEURL".
The URLs can be configured or submitted as follows:
- Configuration in your PostFinance account: In the Transaction feedback tab of your Technical information page: "HTTP redirection in the browser"
- Submission of the URLs in the hidden fields of the order form:
<input type="hidden" name="ACCEPTURL" value="">
<input type="hidden" name="DECLINEURL" value="">
<input type="hidden" name="EXCEPTIONURL" value="">
<input type="hidden" name="CANCELURL" value="">
Field Description ACCEPTURL URL of the web page to display to the customer when the payment has been authorised (status 5), stored (status 4), accepted (status 9) or is waiting to be accepted (pending status 41, 51 or 91). DECLINEURL URL of the web page to show the customer when the acquirer declines the authorisation (status 2 or 93) more than the maximum permissible number of times. EXCEPTIONURL URL of the web page to display to the customer when the payment result is uncertain (status 52 or 92).
If this field is empty, the customer will be redirected to the ACCEPTURL instead.CANCELURL URL of the web page to display to the customers when they cancel the payment (status 1).
If this field is empty, the customers will be redirected to the DECLINEURL instead.
|
Browser alert notification: secure to non-secure environment When your customers return from our secure payment pages to the merchant's (your) website, they might get a browser alert warning that they are entering a non-secure environment, as most likely they are moving from an https:// environment to an http:// environment. When we detect a redirection to your website, we can display a message to notify the customers about the possibility of a risk, thereby avoiding any undue concern about a browser alert. You can activate this option in the Transaction feedback tab of your Technical information page, "HTTP redirection in the browser" section: “I want PostFinance to display a short text to the customer on the secure payment page if a redirection to my website is detected immediately after the payment process”. |
7.3 Redirection with database update
You can use the redirection on the redirection URLs to trigger automatic back-office tasks such as database updates. When a transaction is executed, we can send the transaction parameters on your redirection URLs.
To use this functionality, you must activate this option in the Transaction feedback tab of your Technical information page, "HTTP redirection in the browser":
- “I would like to receive transaction feedback parameters on the redirection URLs”.
7.3.1 SHA-OUT
The redirection is done via the customer’s browser, which makes it visible. Therefore, you must use an SHA-OUT signature to verify the contents of the request and prevent customers tampering with the data in the URL field, which could result in fraudulent database updates.
If you don't configure a SHA-OUT signature, we won't send any parameters on your redirection URLs.
The string to hash is constructed by concatenating the values of the fields sent with the order (sorted alphabetically, in the format ‘parameter=value’), followed by a passphrase. The passphrase is defined in the Transaction feedback tab of your Technical information page, “All transaction Submission modes” section.
For the full list of parameters to include in the SHA Digest, please refer to the SHA-OUT Parameter list. Please note that these values are all case sensitive.
|
Important
|
In the same way we recreate the Digest to validate the transaction input with the SHA-IN, you have to reconstruct the hash, this time using your SHA-OUT passphrase and the parameters received from our system.
If the outcome is not identical, the request’s parameters might have been tampered with. This check guarantees the accuracy and integrity of the parameter values sent in the request.
| Example of a basic SHA-1-OUT calculation Parameters (in alphabetical order, as returned by PostFinance): ACCEPTANCE: 1234 amount: 15 BRAND: VISA CARDNO: XXXXXXXXXXXX1111 currency: EUR NCERROR: 0 orderID: 12 PAYID: 32100123 PM: CreditCard STATUS: 9 SHA-OUT passphrase (in Technical information): Mysecretsig1875!? String to hash (with all parameters in uppercase): ACCEPTANCE=1234Mysecretsig1875!?AMOUNT=15Mysecretsig1875!?BRAND=VISAMysecretsig1875!? CARDNO=XXXXXXXXXXXX1111Mysecretsig1875!?CURRENCY=EURMysecretsig1875!?NCERROR=0 Mysecretsig1875!?ORDERID=12Mysecretsig1875!?PAYID=32100123Mysecretsig1875!? PM=CreditCardMysecretsig1875!?STATUS=9Mysecretsig1875!? Resulting Digest (SHA-1): 209113288F93A9AB8E474EA78D899AFDBB874355 |
7.4 Server-to-server feedback (post-payment)
After the transaction is processed, our system can send an http request transmitting the transaction data, to a URL you've specified. This process, which we often refer to as the "post-sale" request, allows you to update your database with the order status, etc. and trigger an “end of order” process (if this has not already been done after a redirection). It is also an alternative way of generating a personal response for the customer in case of specific needs (if this has not already been done via a redirection).
The set of feedback parameters is the same as that for the redirection. You can find them on the "Feedback parameters" page.7.4.1 Post-payment URLs
You can define the URLs of two executable pages on your site in the "Transaction feedback" tab, "Direct HTTP server-to-server request" section (URL fields) of your Technical information page:
- The first field will ideally contain the URL to which the request parameters are sent if the payment’s status is accepted, pending or uncertain.
- The second field can be the URL to which the request parameters are sent when the transaction has been cancelled by the client or declined too many times by the acquirer (i.e. more than the maximum allowed number of payment attempts as set in the "Global transaction parameters" tab, "Payment retry" section of the Technical information page).
You can enter two different URLs, but you can also use twice the same. You may also enter a URL just in the first field but not for the second.
Do not specify any ports in your URL; we only accept port 443 and port 80.
|
Variable post-payment URLs for multiple shops If you have a post-payment page configured in the Technical information page in your account, but you have several shops each connected to a specific directory for receiving the post-payment feedback, part of your post-payment URL can be variable. This variable part can also be used to e.g. “adapt" the feedback request to include session information, passing it as a part of the URL rather than as an additional parameter. This is the case for Intershop platforms or Servlet systems. The following hidden field should be used: <input type="hidden" name="PARAMVAR" value=""> Example:
Important: do not use any special characters in the PARAMVAR field, as they will be URL encoded, which could create invalid links. |
7.4.2 Timing of the request
Where you configure the post-payment URLs, you must also choose the timing of the feedback request:
- No request
In this case, our system will not send any feedback request. This option allows you to disable your post-payment URLs in the event of maintenance or problems on your server. You shouldn't select "No request" as you're obliged to receive post-sale requests (see Transaction Feedback to the Customer and the Merchant).
- Always deferred (not immediately after the payment)
The feedback request will be sent shortly after the end of the payment process. The feedback request will be a background task and cannot be used to send a personalised feedback to the customer on your website.
If you don't use your post-payment page to personalise a response for your customers, you can receive the feedback request in the background and deferred.
- Always online (immediately after the payment, to allow customisation of the response seen by the customer)
The feedback request will be sent “online” sometime between our system’s receipt of the acquirer’s response and the time it notifies the customer of the payment result.
In this case, the payment process takes longer for the customer, but you can send a personalised response to the customer.
The disadvantage of the online post-payment feedback process is that your system might be detrimentally affected if there are too many requests to your post-payment page (e.g. high per-minute transaction volume) – this could result in long response times before customers receive on-screen feedback.
- Online but switch to a deferred request in intervals when the online requests fail
This option allows merchants who require online post-payment feedback (to tailor the response displayed to the customer) to have a fall-back option, should the online request on his post-payment page fail. In this case we will retry the feedback request every 10 minutes up to a maximum of four times (deferred). In this way, you don't miss out on the transaction feedback, should the online post-payment feedback request fail, e.g. as a result of temporary server problems at your end. The customer will be displayed the standard transaction feedback from our system (see Default reaction).
7.4.3 Response to the customer
We use a possible reply from your post-payment page to show a feedback (end of transaction page) to your customer.
If your “Direct HTTP server-to-server request” URL replies to the HTTP request with:
- an HTML page (containing an <html> tag) or
- a redirection (HTTP 302 Object Moved)
The response from our system will be send this HTML page “as is” to the client browser or perform the 302 redirection, rather than redirecting your customer to one of the defined URLs you may have sent in the hidden fields (ACCEPTURL, EXCEPTIONURL, CANCELURL and DECLINEURL as described in the Redirection depending on transaction result chapter).
Alternatively, if you use none of the above as feedback to your customer, you can have your post-payment page respond with a few lines of text (no <html> tag) which we will include in our standard response, or our system will simply show the standard response (as described in: Default reaction)
The diagram below shows the process at the end of a transaction, should the payment be authorised or accepted, with an online post-payment request. (When the payment is cancelled, declined or uncertain the process is similar but the "CANCELURL", "DECLINEURL", "EXCEPTIONURL" and "cancellation/rejection" pages are used instead).
![]()
7.4.4 HTTP request for status changes
You can also receive an HTTP request in the case of a transaction status change. Therefore, you need to enter a URL in the "HTTP request for status changes" field in the "Transaction feedback" tab of your Technical information page (and select the timing for the request).
This is similar to the post-payment feedback, with the difference that it is only relevant for potential background processes.
You can use the same URL as the one set in the "Direct HTTP server-to-server request" section,
Note: This "status change" URL cannot be used to generate a personal response for the customer.
7.5 Feedback parameters
When a transaction is executed, we can send the following parameter list to your redirection URLs and/or post-payment feedback URLs.
| Field | Description |
|---|---|
| ACCEPTANCE | Acceptance code returned by the acquirer |
| AMOUNT | Order amount (not multiplied by 100) |
| BRAND | Card brand (our system derives this from the card number) |
| CARDNO | Masked card number |
| CN | Cardholder/customer name |
| CURRENCY | Order currency |
| ED | Expiry date |
| NCERROR | Error code |
| ORDERID | Your order reference |
| PAYID | Payment reference in our system |
| PM | Payment method |
| SHASIGN | SHA signature calculated by our system (if SHA-OUT configured) |
| STATUS | Transaction status (see Status overview) |
| TRXDATE | Transaction date |
Example (GET request)
http://www.yourwebsite.com/acceptpage.asp?orderID=ref12345&CURRENCY=EUR&amount=25&PM=CreditCard&ACCEPTANCE=test123&STATUS=5&CARDNO=XXXXXXXXXXXX1111&PAYID=1136745&NCERROR=0&BRAND=VISA&ED=0514&TRXDATE=12/25/08&CN=John Doe
| The list of feedback parameters can be longer if you have activated certain options in your account, such as the Fraud detection module. Please refer to the respective option documentation for more information on extra feedback parameters linked to the option. |
7.5.1 Dynamic feedback parameters
You may also choose which parameters are returned.
To do this, go to the "Transaction feedback" tab of your Technical information page, where you will see a list of "Available" and "Selected" fields. Only the "Selected" fields will be part of the feedback request.
To add or remove parameters from the feedback request, click on the parameter name and click the appropriate arrow to add/remove it to/from the list.
| If you add/remove parameters from this list, do not forget to update your SHA-OUT signature accordingly. Parameters that are not selected here will NOT be contained in the SHA-OUT calculation. |
7.5.2 Variable feedback parameters
You can send us two extra parameters in the hidden fields of the order form, in order to retrieve them as feedback parameter after the transaction. The following hidden fields are available:
<input type="hidden" name="COMPLUS" value="">
<input type="hidden" name="PARAMPLUS" value="">
| Field |
Description |
|---|---|
| COMPLUS |
Field for submitting a value you would like to be returned in the feedback request. |
| PARAMPLUS |
Field for submitting some parameters and their values you would like to be returned in the feedback request. The field PARAMPLUS is not included in the feedback parameters as such; instead, the parameters/values you submit in this field will be parsed and the resulting parameters added to the http request. |
|
Example Extra hidden fields sent: <input type="hidden" name="COMPLUS" value="123456789123456789123456789"> resulting in a redirection with the feedback parameters: https://www.yourwebsite.com/acceptpage.asp?[…standard.parameters…] |
7.6 Feedback reinitialization
In the event that a redirection/feedback request was not performed due to a blocking action by the customer on our secure payment pages (e.g. clicking the back button in the browser), we can reinitiate the post-payment request and/or redirection so your customer will be redirected to the page you want to display and your databases can be updated.
To enable this feature in your account, go to Configuration > Technical information > Transaction feedback > General, and tick the box "I would like PostFinance to re-launch the "end of transaction" (post-payment request/redirection) process if required."
It is possible, however, that you will receive multiple post-payment requests for the same Order ID, since the redirection/feedback request will be resubmitted if the customer returns to our secure payment pages using the back button after having been redirected to your website.
Please ensure you configure your Post URL script to handle these "exceptions". For example, you could configure your Post URL script to create a row in your database for each transaction status posted back, and/or generate an email to inform the merchant of an "exception" to the "expected" steps in the transaction process.
It is recommended that you do not overwrite the first transaction status message you receive with any subsequent messages you receive for the same Order ID - ideally you would store all responses for any order, and invoke a process whereby these can be investigated and dealt with appropriately.
If you do not enable this feature, when the customers click the back button to return to the secure payment pages, they will see a message indicating that the payment has already been processed.
7.7 Confirmation emails
7.7.1 Email to the merchant
Our system can send you a payment confirmation email for each transaction. You can configure this in the "E-mails to the merchant" section of the "Transaction e-mails" tab in your Technical information page.
In the same section, you can also choose to receive emails to be notified of transaction status changes.
7.7.2 Email to the customer
Our system can send an automatic email to your customers notifying them of the transaction registration. This is a standard email whose contents cannot be changed. The sender (“From”) address used when sending the email, is the address you entered in the “E-mail address(es) for transaction-related e-mails” field. If you entered more than one email address in this field, the first one in the row will be used.
You can activate this option in the "Transaction e-mails" tab, "E-mails to the customer" section of the Technical Information page.
You can also choose to send emails to the customer when the transaction is confirmed (data capture) and when a transaction is refunded, by ticking the corresponding boxes. As the sender ("From") email address for these emails, you can configure the "Support E-mail address to include in transaction-related e-mails". If you don't enter an email address here, we will use the first one entered in the "Support E-mail address to include in transaction-related e-mails" in the "E-mails to the merchant" section.
To be able to send confirmation emails to your customers, you must include the customer's email address in the hidden field:
<input type="hidden" name="EMAIL" value="">
| Field | Description |
|---|---|
| Customer’s email address. If you are requesting 3DSv2.1, please ensure that the format of the email is valid, otherwise the authentication process will fall back to 3DS 1.0 |
8. Payment link via e-mail
You can send your customers a payment request by email, redirecting the customer to our secure payment page via a button or link in the email.
If the email is in HTML format you can use a form with hidden HTML fields to send us the necessary parameters in POST format.
If the email is in plain text format you can append the necessary parameters to the URL in GET format. (e.g. https://e-payment.postfinance.ch/ncol/test/orderstandard.asp / orderstandard_utf8.asp?PSPID=TESTSTD&OrderID=order123&amount=12500¤cy=EUR&SHASIGN=8DDF4795640EB9FE9B367315C48E47338129A4F5& …)
For more information, go to Link your website to the payment page.
|
For e-Commerce via email to work, you must bear in mind the following verification related points before the payment:
|
9. Payment method selection options
9.1 Payment method selection on the merchant's site
9.1.1 How to show a specific payment method
When the customers are redirected from your website/shop to our secure payment page, they will be presented with the payment methods that are activated in your PostFinance account.
However, if you want the selection of the payment methods to be done on your own website instead of on our payment page, you can send us the payment method name and/or brand in the hidden fields. In that case, we will only show this particular payment method on our payment page and the customer will be allowed to only pay with this payment method.
The additional hidden fields that you will send are the following:
<input type="hidden" name="PM" value="">
<input type="hidden" name="BRAND" value="">
| Field | Description |
|---|---|
| PM | Payment method or payment method group (e.g. credit card) |
| BRAND | Payment method brand (e.g. VISA) |
Depending on the payment method, you will have to send both fields or only one of them. In many cases the PM and BRAND have the same value, in which case you can send only the PM or only the BRAND.
|
Examples
<input type="hidden" name="PM" value="CreditCard ">
<input type="hidden" name="PM" value="CreditCard ">
<input type="hidden" name="PM" value="iDEAL"> OR <input type="hidden" name="PM" value=""> |
9.1.2 How to return from the payment page to the payment method selection screen
If the customers select the payment method on your website, we will only present the selected payment method on the payment page to the customer.
If the payment with this payment method is unsuccessful and the customers would like to try using another payment method, they will not be presented with a list of your payment methods on our secure payment page, as the payment method selection took place on your website (and not on our secure payment page).
Therefore, to redirect the customers to a URL on your own website, where they can select another payment method, you can use the "BACKURL".
With the BACKURL, when the customers click the “Back” button on our secure payment page, after the authorisation has been declined or after having cancelled from a third-party or bank website, we redirect them to the URL you have entered for the “BACKURL”.
Note: The "back" button described in this section is the back button in our secure payment pages, NOT the back button of the browser.
You can enter the “BACKURL” specified in the "Payment page" tab of your account's “Technical information” page.
However if you prefer not to always use the same URL, you can also send us a specific “BACKURL” in the hidden fields. The “BACKURL” sent in the hidden fields will override the general “BACKURL” entered in your account.
You can send the “BACKURL” in the following hidden field:
<input type="hidden" name="BACKURL" value="">
| Field | Usage |
|---|---|
| BACKURL | URL of the web page to display to the customers when they click the “Back” button on our secure payment page. |
If the customers select the payment method on our secure payment page and not on your website, the “BACKURL” is not taken into account. Consequently, when the customers click the “Back” button on our secure payment page, they will simply be redirected to our secure payment method selection page.
9.2 Show a specific list of payment methods
If the customer is to select the payment method from a specific list of payment methods on our payment page, you can send us this list of payment methods in the hidden fields, so we will only show these specific payment methods on our payment page.
The hidden field is the following:
<input type="hidden" name="PMLIST" value="">
| Field |
Description |
|---|---|
| PMLIST |
List of selected payment methods and/or credit card brands. Separated by a “;” (semicolon). |
Example
If you only want your customer to choose between VISA and iDEAL on our payment page (i.e. if you also have other payment methods that you don’t want to be displayed), the hidden field and its value will be:
<input type="hidden" name="PMLIST" value="VISA;iDEAL">
9.3 Exclude specific payment methods
If you wish to not present a specific payment method to the customer, you can use a hidden field to do so. This is particularly useful for sub-brands, when you want to accept a brand (e.g. MasterCard) but not one of its sub-brands (e.g. Maestro).
The hidden field is the following:
<input type="hidden" name="EXCLPMLIST" value="">
| Field |
Description |
|---|---|
| EXCLPMLIST |
List of payment methods and/or credit card brands that should NOT be shown. Separated by a “;” (semicolon). |
9.4 Layout of the payment methods
You can arrange the layout/list of the payment methods on our payment page using the following hidden field:
<input type="hidden" name="PMLISTTYPE" value="">
| Field |
Possible values |
|---|---|
| PMLISTTYPE |
The possible values are 0, 1 and 2:
|
9.5 Split credit/debit cards
The functionality to split VISA and MasterCard into a debit and a credit payment method allows you to offer them to your customers as two different payment methods (e.g. VISA Debit and VISA Credit), or you can decide only to accept one of both split brands.
To use the split of credit and debit cards via e-Commerce, you need to include the CREDITDEBIT parameter in the hidden fields that you send to the payment page (and therefore also include in the SHA-IN calculation!).
| Field | Format |
|---|---|
| CREDITDEBIT | "C": credit card "D": debit card |
Related error: When the buyer selects the debit card method but next enters a credit card number, an error code will be returned: ‘Wrong brand/Payment method was chosen’.
If the payment is successfully processed with the CREDITDEBIT parameter, the same parameter will also be returned in the post-sale feedback. However, whereas the submitted values are C or D, the return values are "CREDIT" or "DEBIT".
You will also find these return values in transaction overview via "View transactions" and "Financial history", and in reports you may download afterwards.
|
Configuration in your account The split functionality can also be activated and configured per payment method, in your PostFinance account. Go to Split Credit/Debit Cards for more information. |
9.6 Processing transactions with stored credentials
Credential-on-file (COF) transaction uses existing card details that are already stored by merchants to process the payment. Before initiating a credential-on-file (COF) transaction, the cardholder will first need to authorize the merchant to store the card details. Credential-on-file (COF) mostly applies to recurring payments and states whether the payment is initiated by a cardholder or merchant.
There are two types of credential-on-file (COF) transactions: cardholder-initiated transaction (CIT) or merchant-initiated transaction (MIT). Cardholder-initiated transaction (CIT) will always need to take place before initiating merchant-initiated transaction (MIT).
A cardholder-initiated transaction (CIT) is a transaction where the cardholder is involved in the transaction and personally authenticates the transaction, by means of a signature, 3D-Secure appliance, or presenting IDs.
Example of a cardholder-initiated transaction (CIT):
A cardholder buys a train ticket online and makes a payment. He/She makes the payment with his/her credit card and is being asked to authenticate and authorize the payment. At the same, the cardholder is also asked if he/she wants to save the credit card information related to this payment. If the cardholder agrees, this information can then be re-used in future transactions initiated by the merchant.
A merchant-initiated transaction (MIT) is a transaction initiated by a merchant that acts as a follow-up to a cardholder-initiated transaction (CIT) and a pre-agreed standing order for goods and services purchased by the cardholder. The cardholder does not have to be involved in the transaction.
Example of a merchant-initiated transaction (MIT):
A merchant can automatically initiate a transaction to fulfill a cardholder’s payment on a monthly magazine subscription.
In compliance with the regulations set by Visa and MasterCard for credential-on-file (COF) transaction, new parameters need to be sent to determine the COF transaction.
Impacted if:
- You are using an Alias
- You plan to initiate recurring transactions (scheduled or not) after initiating a cardholder-initiated transaction (CIT) for the first time
Required action
By default, these parameters are used in an eCommerce transaction:
|
Parameter values COF_INITIATOR-COF_TRANSACTION-COF_SCHEDULE |
Description |
|---|---|
| CIT-FIRST-UNSCHED |
Applies when an alias is used or created |
| CIT-FIRST-SCHED |
Applies to a first scheduled payment/subscription |
The default values are flagged if you don't add any parameters. However, if you want to change it, you can overwrite these default values by sending the new parameters. Do not forget to recalculate the SHA signature as well (click here for more information about SHA signature).
|
Parameters |
Values |
Description |
|---|---|---|
| COF_INITIATOR* | CIT | A transaction initiated by a cardholder |
| MIT | A transaction initiated by a merchant |
|
| COF_SCHEDULE* |
SCHED | A scheduled transaction |
| UNSCHED | An unscheduled transaction | |
| COF_TRANSACTION* |
FIRST | First of a series of transactions |
| SUBSEQ |
Subsequent series of transactions |
|
| COF_RECURRING_EXPIRY* | Date YYYYMMDD (i.e. 20190914) | currently available in TEST only End date : date of the last scheduled payment of a series |
| COF_RECURRING_FREQUENCY* |
numeric between 2 and 4 digits (i.e. 31, 031 or 0031) |
currently available in TEST only Days between payments for a scheduled series. |
10. Optional fields
10.1 Operation
|
Important The ability to work in two stages (authorisation + data capture) depends on the payment methods you wish to use. (See the "Payment Methods Processing/Procedure overview" in the Support section of your account). |
If you prefer not to use the same operation code as selected in the "Global transaction parameters" tab, in the "Default operation code" section of the “Technical Information” page in your account for a given transaction, you can send us a specific operation code for this transaction.
The operation code you send us in the hidden fields will override the default operation code selected in the "Default operation code" section of the "Global transaction parameters" tab, on the “Technical information” page in your account. You can send the operation code with the following hidden field:
<input type="hidden" name="OPERATION" value="">
| Field | Description |
|---|---|
| OPERATION |
Operation code for the transaction. Possible values for new orders:
|
10.2 User field
If you have multiple users in your account and you want to register transactions associated with a specific user (e.g. for call centre agents logging transactions via e-Commerce), you can send the USERID in the following hidden field:
<input type="hidden" name="USERID" value="">
| Field | Description |
|---|---|
| USERID | The username specified in the account’s user management page |
This field is just an informative field to add a USERID to a specific transaction. We do not perform any check at our end to establish e.g. if there have been password errors for this user. The only check we perform is to verify that the USERID is valid. If the USERID does not exist, we will replace it by the default USERID of the account (PSPID).
11. Secure payment with 3-D Secure
An important part of the transaction processing flow for your customer is the 3-D Secure (3DS). There is no effort for you involved, except having 3DS active on all your card payment methods, and we will take care of everything necessary.
Following the introduction of 3DSv2, new rules apply. Although we collect all relevant data for you during the payment process, you can still make the 3DSv2 approach to risk evaluation more effective. You can achieve this by sending additional parameters along with the transaction.
Mpi.WorkPhone.countryCode + Mpi.WorkPhone.subscriber
or
Mpi.MobilePhone.countryCode + Mpi.MobilePhone.subscriber
or
Mpi.HomePhone.countryCode + Mpi.HomePhone.subscriber
or
EMAIL
Have a look on the recommended and optional parameters for a typical transaction request. These parameters need to be included in the SHA-calculation.
PSD2 enhances the transparency of the payment process for you and your customers. This is especially helpful when dealing with status 2 transactions.
Our feedback parameter CH_AUTHENTICATION_INFO provides you with detailed information from the issuers when they reject your customers' transactions.
Share this information with your customers to help them understand why their bank declined their transaction.
To receive CH_AUTHENTICATION_INFO in your redirection URLs, select this parameter in the Back Office via Configuration > Technical information > Transaction feedback > Dynamic e-Commerce parameters. This will also ensure that this information is visible in the transaction overview via Operations > View transactions / Financial history.
As you will not receive the information early enough to modify your redirection URLs accordingly once a transaction is finalised, we recommend flagging "I would like PostFinance to display a short text to the customer on the secure payment page if a redirection to my website is detected immediately after the payment process." in the Back Office via Configuration > Technical information > Transaction feedback > eCommerce > HTTP redirection in the browser. Our platform will then redirect your customers to our intermediate result page showing the information before your customers end up on your redirection URLs eventually.
Use the following card numbers in our Test environment to simulate an issuer response:
Amex: 349586710563469
MasterCard: 5111823134937549
Visa: 4010759044222272
11.1 Exclusions and exemptions for 3DSv2
Some transactions are excluded from SCA. If any of your transactions are among them, 3-D Secure will not be rolled out. For more information which type of transaction they are, consult our dedicated guide here.
You can request to omit 3-D Secure in two ways
- Authentication by selecting the appropriate values for Mpi.threeDSRequestorChallengeIndicator and 3DS_EXEMPTION_INDICATOR
Parameter Values Mpi.threeDSRequestorChallengeIndicator Length: 2 characters
Data Type: String
Values accepted:
- 01 = No preference
- 02 = No challenge requested - use this value for low amount transactions (below 30 euros)
- 03 = Challenge requested: merchant Preference
- 04 = Challenge requested: Mandate - use this value when setting up a recurring transaction with your customer or when retrying the transaction after soft decline
- 05 = No Challenge Requested [transactional risk analysis is already performed] use this value if your acquirer agreed on TRA exemptions with you
- 07 = No Challenge Requested [SCA is already Performed] use this value when you do the SCA on your side, has to be approved by your acquirer
3DS_EXEMPTION_INDICATOR Length: 2 characters
Data Type: String
Values accepted:
- 03 = Issuer TRA*
- 04 = Low amount exemption (below 30 euros)
- 05 = Merchant/Acquirer TRA*
- 06 = White Listing
- 07 = Corporate
- 08 = Delayed Shipment
- 09 = Delegated authentication (certified wallet)
* Transaction risk analysisCheck out the authentication log in the Back Office and search for “TransStatus = I” to see if the issuer has granted the exemption. However, you will loose the liability shift in a case of a fraudulent transaction
- Authorisation by selecting the appropriate 3DS_EXEMPTION_INDICATOR and FLAG3D
To skip 3-D secure altogether, send the following parameters:
Parameter Values FLAG3D N = Skip the 3DS authentication process
3DS_EXEMPTION_INDICATOR Length: 2 characters
Data Type: String
Values accepted:
- 03 = Issuer TRA*
- 04 = Low amount exemption (below 30 euros)
- 05 = Merchant/Acquirer TRA*
- 06 = White Listing
- 07 = Corporate
- 08 = Delayed Shipment
- 09 = Delegated authentication (certified wallet)
* Transaction risk analysis
However, it is still up to the issuer whether an authentication process must take place. In case the issuer insists on 3DS, the transaction will be declined with error code 40001139.
If transaction is accepted without 3-D Secure, you will loose the liability protection.
When your customers are setting up a new recurring payment with you, under the PSD2 rules, the first transaction always have to be strongly authenticated. Submit all the relevant 3DS parameters, COF parameters together with Mpi.threeDSRequestorChallengeIndicator=04. This will make sure that the issuer is aware of this request and will approve the transaction
Frictionless / challenge flow
If you do not want to request an exemption but rely on the issuers rolling out a frictionless flow and keep your liability protection, send some additional parameters.
Sending these parameters for these schemes raise the chance for a frictionless flow:
- Carte Bancaire (if you are on low risk merchant program, they are strongly required)
ECOM_BILLTO_POSTAL_CITY
ECOM_BILLTO_POSTAL_COUNTRYCODE
ECOM_BILLTO_POSTAL_STREET_LINE1
ECOM_BILLTO_POSTAL_POSTALCODE
EMAIL
Mpi.HomePhone.countryCode
Mpi.HomePhone.subscriber or Mpi.MobilePhone.subscriber
Mpi.shippingIndicator
REMOTE_ADDR - MasterCard
ECOM_BILLTO_POSTAL_CITY
ECOM_BILLTO_POSTAL_COUNTRYCODE
ECOM_BILLTO_POSTAL_STREET_LINE1
ECOM_BILLTO_POSTAL_POSTALCODE
EMAIL
Mpi.HomePhone.countryCode
Mpi.HomePhone.subscriber or Mpi.MobilePhone.subscriber
ADDMATCH
REMOTE_ADDR
You can even increase the chance of a frictionless flow and a higher conversion rate by sending more optional parameters.
Soft Decline
A typical flow of a soft declined transaction looks like this:
- In your first request, send FLAG3D=N together with the appropriate value for 3DS_EXEMPTION_INDICATOR and no further authentication parameter. This way you indicate that you wish to skip 3-D Secure. The transaction might be accepted already now.
If it is rejected by your customer’s bank because it insists on 3-D Secure, we will indicate this in the feedback parameter by sending NCERROR=40001139. The transaction will be put in status 2. - To recover this declined transaction, resubmit the transaction by sending the following parameters to our platform
- The standard request for e-Commerce / DirectLink parameters as sent in your first request as a new order
- FLAG3D=Y to indicate 3-D Secure needs to be rolled out
- The 3DSv2 authentication parameters as described here
- Mpi.threeDSRequestorChallengeIndicator=04 to indicate that your customer’s bank insists on 3-D Secure following the Soft Decline
Your customer will have to pass the 3-D Secure authentication during this second request. Finally, the transaction will reach either status 2 or 9. This depends on both whether your customer passed the authentication and the payment is accepted by both your and your customer’s bank.
| Soft Decline is currently available for payment methods Visa, MasterCard, American Express and Carte Bancaire. |
11.2 Test cards
You can use the following test card to simulate a 3-D Secure registered card in our test environment:
| Frictionless Flow | ||
|---|---|---|
| Brand | Card number | Expiry date |
| VISA | 4186455175836497 | Any date in the future |
| Mastercard | 5137009801943438 | Any date in the future |
| American Express | 375418081197346 | Any date in the future |
| Carte Bancaire | 4150557357382737 | Any date in the future |
| Challenge Flow | ||
|---|---|---|
| Brand | Card number | Expiry date |
| VISA | 4874970686672022 | Any date in the future |
| Mastercard | 5130257474533310 | Any date in the future |
| American Express | 379764422997381 | Any date in the future |
| Carte Bancaire | 4150550997933993 | Any date in the future |
| More test cards numbers can be downloaded here. |
FAQs
In your PostFinance account menu, you can easily lookup your transactions by choosing "Operations" and then clicking either "View transactions" or "Financial history", depending on the type of transaction results you're looking for.
Go to Consult your transactions for more information.
You can easily refund a payment with the "Refund" button in the order overview of a transaction (via View transactions). If your account supports it, you can also make refunds with a DirectLink request or with a Batch file upload (for multiple transactions).
Please note that the Refunds option has to be enabled in your account.
Go to Maintain your transactions for more information.
You can only perform refunds on transactions for which the funds have already been transferred to your bank account. A cancellation or deletion can be done before a payment has been fully processed, i.e. before the daily cut-off time at the acquirer, at which point all transactions of the previous day are processed.