Use your PostFinance Account
1. Introduction
In this guide, we explain you how to use your PostFinance account, which we sometimes refer to as the Back Office.2. Login screen
To access your PostFinance Account menu, you have to log on to the Back Office.
Depending on the environment that you want to access you have to use one of the following URLs:
- Test: https://e-payment.postfinance.ch/ncol/test/
- Production: https://e-payment.postfinance.ch/ncol/prod/
To clarify which environment you are logged on to, the tab containing the login section will be marked with either the label "Identification TEST" or "Identification Production".
Before you log on, you still can change the environment by clicking either the "Access to test" or "Access to production" link below the login form.
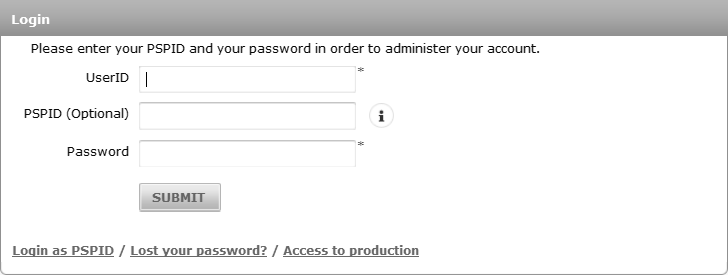
In each environment you have the possibility to log on with:
- 'PSPID' and 'Password'. This Login section is displayed by default.
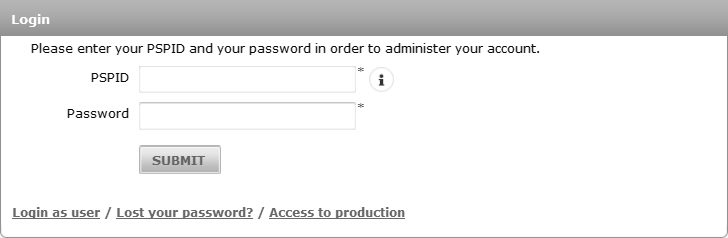
- 'UserID', 'PSPID (Optional)' and 'Password'. You can display this Login section by clicking the "Login as user" link. Use this possibility if your account has more than one user registered and you want to log on as one of these users.
Once you are logged on, the Account menu is displayed on top of the page.
The menu contains the following sections:
- 'Home'
- 'Support'
- 'Configuration'
- 'Advanced (optional)'
- 'Operations'
On the upper-right hand corner of your account homepage, you can see the "User profile" drop-down icon and the "Language selection" icon.
1. User profile drop-down
The user profile drop-down displays the user profile, user role, date and timestamp of the last login, and the time zone. Through this option, users can do the following:
- Reset their password by clicking the "Change password".
- Log out of the session by clicking "Logout".
2. Language selection drop-down
Users can select the language which they want to display the Back Office content. There are currently six languages to choose from: English (EN), French (FR), Dutch (NL), German (DE), Spanish (ES), and Italian (IT).
3. Account Menu
3.1 Home
Once you're logged in, you are on the home page of your account. On the home page, you can find general and technical messages and announcements about our platform, as well as alerts specific for your account (e.g. transactions).
If it's your first login session (usually in the test environment), you will see a list of steps to follow.
To find out more on how to set up your account, go to Test Account creation.
3.2 Support
3.2.1 Support menu
In our Support section you can find:
- Integration & user manuals
- Frequently Asked Questions (FAQ)
- Platform releases (with information on our latest platform changes)
- Our contact details
3.3 Configuration
3.3.1 Password
Here you can update passwords for your user(s). You can change your password at any time; in two cases, however, our system will automatically ask you to change your password for security reasons:
- You have logged in for the first time with a password that has been newly issued by our system (the initial account password, a new password you were issued via the "Lost your password?" procedure or a "New password" action in the user manager page) as the password automatically expires upon the first login.
- You have been using a password (which you chose yourself) for a period of 90 days.
To change your password, click the "Change password" under the User Info icon on the upper-right hand corner of your Back Office account and follow the instructions. You will be asked for your current password, and to enter and confirm your new password. For added security, you can also activate or deactivate two-factor authentication. See below for more information.
Note: If you wish to change the invariable API password, select the API USERID in the USERID drop-down box on the "Change password" and set the new password.
Two-factor authentication
Two-factor authentication (2FA) adds an additional layer of security to your account by requiring a second dynamic passcode on top of your standard PostFinance username and password. Once the 2FA verification is activated, you will be required to enter a time-based one-time passcode (along with your existing login password) as unique verification code to log into the PostFinance account. Please note that a mobile device is required to generate the time-based one-time passwords.
Please install an authenticator application on your mobile device. The PostFinance account supports the following authenticator applications: Google Authenticator (Android, iOS, BlackBerry), Authenticator (Windows Phone). Please note that from the moment 2FA authentication is activated on your account, it is also linked to your mobile device. Before changing or resetting your mobile device, we strongly advise you to deactivate your 2FA authentication before setting it up on your new device.
How to activate
- To activate 2FA in your PostFinance account, go to Configuration > Password > One Time Password configuration.
- You will be directed to the One Time Password configuration page. Open the authenticator application on your mobile device and scan the QR code displayed on the page (or fill in the number right below the QR code).
- Confirm the activation by entering the 2FA passcode.
- Enter your PostFinance account password to confirm the modification and click “Submit”. You have now activated 2FA in your PostFinance account.
How to deactivate
You can deactivate 2FA for your user:
- Go to Configuration > Password > One Time Password configuration.
- Open the authenticator application on your mobile device. On the One Time Password configuration page, enter the 2FA passcode displayed on your mobile device.
- Confirm your request to deactivate 2FA by entering the PostFinance account password to confirm the modification and click “Submit”.
- You can also request an administrator (with access to user management) on your enabled account to deactivate 2FA.
- Go to User Management > select the user details > uncheck One-time password active.
How to login with two-factor authentication
- Enter your user password at the PostFinance account login page.
- Once redirected to the 2FA page, enter the 2FA passcode.
- Proceed as you would normally do.
- All 2FA passcode can be found by opening the authenticator application on your mobile device.
- The authenticator generates a new passcode every 30 seconds.
- Always enter the passcode associated with the scanned QR code. Other passcode from past QR codes will not work.
- A QR code does not display when 2FA is already activated. Once 2FA is deactivated, a new QR code displays for 2FA to be activated again.
3.3.2 Account
Under Account you can check and/or modify your account’s administrative details:
- Your administrative details:
- Legal company name
- Commercial company name (as shown to your customers)
- Telephone number
- Email address ...
- Your invoicing information: invoicing details ...
- Your subscription: subscription type
- Your options: overview of your current solution and the available 'Recommended & other options' for your account.
- Languages and URL: indication of the various languages in which you want to be able to display the payment page, and a field to enter the URL for the general conditions (only visible for accounts with e-Commerce 3-tiers access).
- Currency: indication of the currencies in which you wish to accept your customer’s payments, and which are accepted by your acquirer (only visible for accounts with the multi-currency option).
- Data Retention Management: Here you can change the number of days you want your transaction data to be saved on our platform. You can choose any number between 45 and 540 days. The default is 540 (about 18 months). After the configured time, the transaction data is deleted.
3.3.3 Users
With the 'Users' link you can:
- Create new users
- Edit existing users
- Send new passwords to users
For more information, go to User Manager.
3.3.4 Alias (Alias Manager option)
This is the Alias Manager option, which allows you to create and update aliases.
For more information, go to Alias Manager.
3.3.5 Technical information
Under Technical information you can configure the technical integration parameters for your account.
With each setting on the Technical information page, you'll find the "i" icon to explain the particular setting.
For more information, go to the relevant page for your account mode: e-Commerce / DirectLink / e-Terminal / Batch
3.3.6 Error logs
On the Error logs page you can check a list with various technical errors that have occurred in the last three days.
These errors usually arise from issues with your integration or setup. You may encounter errors in the following modes (if applicable to your account):
- e-Commerce
- DirectLink
- Automatic File Upload
For most errors, you can find explanations on our possible errors page.
If you can't find the explanation for a specific error, we recommend you to check with our customer care Merchanthelp.
Optionally, you can also have our debug mode activated (temporarily, up to 8 hours). This allows you to see what causes a specific error, and thus how to resolve it. Please contact our customer care Merchanthelp should you want to activate debug mode.
3.4 Advanced
3.4.1 Fraud detection (Fraud detection module option)
With this link you can configure your fraud detection module.
For more relevant information concerning your account, go to Fraud Prevention.
3.4.2 Subscription (option)
With this link you can configure the Subscription Manager (option).
For more information, go to Subscription Manager.
3.5 Operations
3.5.1 Financial history
With this link you can:
- View and check your payment statuses
- Perform global accounting reconciliations via the "Financial history" link
For more information, go to Consult your transactions.
3.5.2 View transactions
With this link you can:
- View and check your transaction details
- Perform maintenance operations on your transactions
3.5.3 New transaction (e-Terminal option)
With this link you can manually submit a new payment.
For more information, go to e-Terminal.
3.5.4 New file (Batch option)
With this link you can manually upload a new payment file.
For more information, go to Batch.
3.5.5 View files (Batch option)
With this link you can select and consult your uploaded payment files.
For more information, go to Batch.
3.5.6 Electronic reporting
On the Electronic reporting page, you can configure the format and structure you want to use for electronic reports such as file downloads.
Specific fields are returned in your downloaded file depending on your file structure.
You can choose one of the following file structures:
- Standard
- Extended
- File Management
- Dynamic
You can also choose one of the following formats:
- XML
- Fixed-length
- Delimited
For more information:
- Log on to your PostFinance account.
- Select "Electronic reporting" in the Operations menu.
To change the file format for a specific user in your account:
- Click the "Users" link in your account menu.
- Click the "Edit" button next to the user whose file format you want to change. Next the configuration page appears.
- Click on the "Electronic Reporting for this User" link. Next the electronic reporting page appears.
- Make your changes.
When the Push-Reports option is activated in your account, the electronic reporting link will enable you to access a list of your push reports.
4. Time Zone Management
You can change the time zone by clicking the User Info icon located on the upper-right hand corner of your Back Office account and follow these instructions:- Click on the time zone next to "Last login" and a Time zone pop-up window displays.
- Click on "Time zone" to change the time zone.
- Select "Automatically adjust to daylight saving changes" to request the system to automatically update the clock when daylight saving happens.
- Click "Save" to save the new changes, or "Back to default" to revert back to the default the time zone which is to set to Central European Time (CET).
- All relevant back-office pages
- Downloaded transactions and files/reports
By selecting this option, the time is also automatically adjusted to daylight saving changes.
FAQs
If you want to change the PSPID name for an existing production account, please contact your PostFinance Account Manager who will open a new account for you.
The PSPID name of your existing production account cannot be changed, but a new account with a new name can be opened for you.
Please note there will be a fee for this service.
The time to activate a payment method depends on the following factors:
- It generally takes the acquirer or bank about a week to complete your affiliation. If you already have an affiliation, the activation takes a few days.
- Some payment methods require additional checks before they can be activated, e.g. in case of 3-D Secure, which is requested directly at VISA or MasterCard (and not at the acquirer).
With PostFinance Collect, you can activate several payment methods in one go.
If you want to change your invoicing address or the way you pay your invoices, please send an email with your PSPID to our Customer Care department
Our Customer Care team will take care of your request.
Please contact our team who can help you to get a copy of your invoice.
In your PostFinance account menu, you can easily lookup your transactions by choosing "Operations" and then clicking either "View transactions" or "Financial history", depending on the type of transaction results you're looking for.
Go to Consult your transactions for more information.
You can easily refund a payment with the "Refund" button in the order overview of a transaction (via View transactions). If your account supports it, you can also make refunds with a DirectLink request or with a Batch file upload (for multiple transactions).
Please note that the Refunds option has to be enabled in your account.
Go to Maintain your transactions for more information.
There are different reasons why you can't refund a transaction. You need to consider the following (with the condition that the Refund option is enabled in your account):
- The transaction is in an "incomplete" status, such as a pending or erroneous status (91, 92 etc.) that doesn't allow the refund operation.
- If the transaction is authorised (status 5), at which point no payment has been made yet. In this case you have to cancel the authorisation instead of refund.
- The used payment method doesn't support the refund functionality, which can be the case with certain debit cards, web banking methods and "offline" payment methods such as Bank transfer.